The field of embedded System is continuously evolving and lot of improvements and features are getting added up. The Raspberry pi is one of the important embedded system device and evolving as Internet of Things gateway device.
Hardware Description of Raspberry Pi
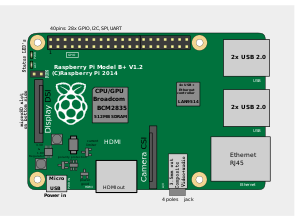
The Raspberry Pi is next generation credit card sized mini computer with many features as conventional computer and also has GPIO pins that can be used for Microcontroller applications.
The Raspberry Pi has ARM Cortex processor, the single core processor with 700 MHZ clock frequency is used in Raspberry Pi 1 and Quad core processor of clock frequency 900 MHZ and 1200 MHZ is used in R-Pi 2 and R-PI 3 respectively.
The memory is provided to raspberry pi by external SD card, The SD card is also loaded with suitable operating system, the most popular and preferred operating system is Raspbian.
The Pi also has USB ports which enables us to connect keyboard, Mouse , Pen drive, and it also has a HDMI slot to connect the monitor and one slot for camera interface and it also has one slot is provided for connection the LAN cable to access the internet. The Raspberry Pi can be powered by suitable power adapter of prescribed voltage rating.
Various operations on Pi
As described earlier Pi is a mini computer, you can do certain operations as you do in your computer,
like creating a file, deleting file and we can write own program and run it.
If Raspian or other Linux distributed OS is installed, In LX terminal we can perform various operations in raspberry Pi, to create a directory use the command mkdir dirname, for example mkdir pi. To go in to the directory use the command cd, the command "cd pi" will go in to the directory pi. To Write a C program and run it, first open a suitable editor either "vi" or "nano",Eg "nano helloworld.c" and write your C program and save the program. To save the program in vi editor press Esc and ":wq".To save the program in nano editor press "ctrl+x". To compile the program "gcc helloworld.c" now object file will be created and to run the program type "./a.out", the output will be displayed on the screen.To install any package we can use the following command "sudo apt-get install 'packageName'",for example to install sqlite3 database "sudo apt-get install sqlite3", this will install sqlite3 database in raspberry pi. To install some third-party packages we can use the wget command to install the package.
Accessing GPIO pins
The Raspberry Pi has GPIO( General Purpose Input Output) pins that can be used to give digital Input or allows us to take digital output. The number of GPIO pins varies from one model of raspberry Pi to another.
The important point to be noted is Analog inputs cannot be given directly to the Raspberry Pi, so we need external device(such as Expander Pi) to read analog input.There are two ways of numbering the I/O pins in Raspberry Pi within RPi.GPIO. The first is using the BOARD numbering system. This refers to the pin numbers on the Pi header of the Raspberry Pi board. The advantage of using this numbering system is that your hardware will always work, regardless of the board revision of the R-Pi. You will not need to rewire your connector or change your code. The second numbering system is the BCM numbers. This is a lower level way of working - it refers to the channel numbers on the Broadcom SOC. You have to always work with a diagram of which channel number goes to which pin on the RPi board. Your script could break between revisions of Raspberry Pi boards.
To access GPIO pins we need to install RPI.GPIO python library. The RPI.GIPO is installed by default in Raspbian, to ensure that it is in the latest version please follow the following steps
1) sudo apt-get update
2) sudo apt-get install python-rpi.gpio python3-rpi.gpio
3) sudo apt-get install python-dev python3-dev
These three command is needed to access the raspberry pi GPIO pins with help of some python code.
Now let us see some python code to write and read digital pins,
Now Let us see simple program that is to set the digital output
import RPi.GPIO as GPIO ## Import GPIO library
GPIO.setmode(GPIO.BOARD) ## Use board pin numbering
GPIO.setup(7, GPIO.OUT) ## Setup GPIO Pin 7 to OUTGPIO.output(7,True) ## Turn on GPIO pin 7
First line of code is to import the library that allows to use to access the GPIO pins via python script
then then the Board pin Numbering is used, to use the BCM pin numbering use the following command GPIO.setmode(GPIO.BCM). The next line of code is to set the particular pin as output and to turn on the pin True is used, to turn off the particular pin False is used.
Let us another pin used to read digital input
import Rpi.GPIO as GPIO
GPIO.setmode(GPIO.BCM)
GPIO.setup(23, GPIO.IN, pull_up_down = GPIO.PUD_DOWN)
GPIO.setup(24, GPIO.IN, pull_up_down = GPIO.PUD_UP)
while True:
if(GPIO.input(23) ==1):
print(“Button 1 pressed”)
if(GPIO.input(24) == 0):
print(“Button 2 pressed”)
GPIO.cleanup()
To read the input, we need to specify whether the pin is used as Pull_up or Pull_down, these specification is very much necessary to set the particular pin as input. The while true indicates its a infinite loop and GPIO.input(23) is used to read the pin number 23. similarly same is used for pin number 24.
So these are the very basic operations that are performed on the raspberry pi, the raspberry-pi has more capabilities and can act as IOT gateway device.
Thank You
No comments:
Post a Comment